Monday, December 31, 2012

Vellum Lights and Paper Wraps


Winding down to the end of the holiday decoration posts, I've saved this one for last.  Why?  Well because these ideas can be repeated for virtually ANY holiday, not just Christmas.

The vellum lights are an idea I came by from photos posted by other Creative Memories consultants.  I saw their photos but didn't read their full descriptions of how to create them, so maybe mine are the same and maybe different.


You can see my vellum lights pictured above in this decorative setting in my den.  The lights sit amoungst my Everyday displays that highlight some of the many photo cards I've received from family and friends.

To make the vellum lights, I first gathered some supplies:

1.  Vellum Paper.  I got mine at Creative Memories but they no longer sell it - check your art and craft stores for vellum paper.

(ask me about digital vellum paper and I'll tell you how to make it in Storybook Creator software)

2.  Battery operated candle lights (candle cheaters - great for dorms or kids' bedrooms and other places where candles are too dangerous or not allowed). 


Both tea light size and stand alone candle size in white or cream will do.


3.  Small glasses or clear glass votives (that fit a tea light down inside).

4.  Scraps of colored or decorative cardstock paper.

5.  A border maker tool from Creative Memories with any cartridges you like.

6.  Mini tape runner or glue pen.

7.  Clear tape - like scotch tape or staples brand or some such (not the type used for scrapbooking).

STEP 1: Measure the diameter of your standalone candles and glass votives or small glasses.
STEP 2: Cut a piece of vellum paper that is the same length as your above measurement and a width that suits your design. 
STEP 3:  Use the bordermaker to cut a border from your colored paper and cut it to the same measurement as in step 1.
STEP 4:  Attach the border to the vellum at any height, bottom, top, middle are all good.  I used a mini tape runner for this step.
STEP 5:  Curl your vellum with border into a cylinder (I actually made mine just slightly larger than my glasses and candle so as to just slip them over the top).  Use scotch tape to hold the curled paper in its shape.  I used 3 pieces of tape at the top bottom and middle.  I didn't opt for tape runner for this because it didn't stick as well for holding this in a cylinder shape.


STEP 6:  Place the cylinder over top the glass or candle.
STEP 7:  Turn on the candle.  VOILA!

NOTE:  I placed a few tissues inside of the small glasses that held the tea lights so the tea light battery candles would sit at different heights giving the illusion that the candles had burned down to different levels.

Vellum cylinders can be removed and saved for future holidays (cut thru tape, flatten and save) and new designs can be created for other holidays - brilliant, love them!


NOW on to the gifts:

This year I wrapped most of my gifts in cast off sweaters, jeans pant legs, and random fabric scraps.  I tagged the gifts with cutout Chrismtas cards from last years holiday greeting cards. 


However, I did use scrapbook paper in holiday designs to wrap some of the smaller gifts and to use up some of the scrapbook paper that I have.  As a cm consultant I open a lot of paper packs to use for demo purposes and I like to use them up so that I can purchase new packs the following year!

Here are some photos of my scrapbook paper and scrapbook tool decorations - I've also used photos as tags and just punched them with my tag maker (one of my favorite tools).  And, I wrapped some gifts with last year's open house customer gift wrap with added scrapbook embellishments.


NOTE:  Ok.  I love cM tools, but I'm very frustrated that sometimes the tools don't cut well when using the thinner decorative paper - so it is with the tag maker.  I have found that if I punch TWO pieces of decorative paper at the same time (giving it the heavier weight of solid color cardstock), I have a better result.  The pocket punches work marvelously with both weights of paper, but some of the other punches and tools have more trouble with the thinner weights of card stock.  Just beware.  And cM - improve upon this! 'nuf said.

Still got some leftover paper?  Dig into your recycle bin and pull out some jars and cans, decorate them with scrapbook paper, add greenery - instant decor.


MORE?  Finish off your napkins with a little bling.


So go make yourself some beautiful twinkling vellum votives for the New Year and wrap up your final new years hostess gifts in your remaining holiday scrapbook paper - and happy new year to you all!


Thanks so much to all of you who follow my blog - and a special thanks to all of you who have gone the extra mile to become a public follower - I so appreciate all your support and kind feed back.


Happy New Year - Sher

Sunday, December 30, 2012

Dynamically Digital Holiday

Christmas at my house brought a lot of crochet.  Read my Christmas Crochet post on my other blog by clicking here.  But, Christmas brought an equal amount of digital gifts.

The first digital gift is a storybook.


I also made several wall prints.  I made a family wallprint for each of my kids.


Here's what the print looked like:


I made a really cool poster for my nephew and my niece.  These were two of my favorite digital gifts.

 
Storybooks, Wallprints, is there more? Yup. Custom Album Cover.


Don't stop yet, there's more: MUGS!

 
Each of my 3 boys got a mug and I made one each for my parents too.  Here's how my kids' Kronum mugs looked:
 
 
And here's how my parents' mug design looked.


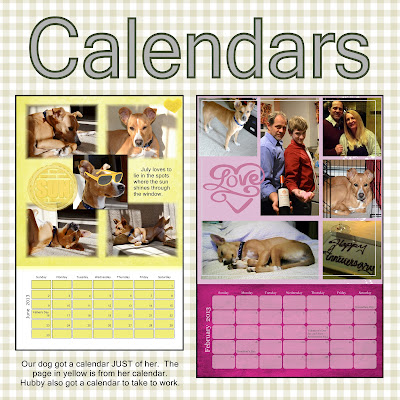
That is not the end to the digital gifts... I made two calendars.  I made an 8X12 calendar all about our dog.  I made a 12X18 calendar for my husband to take to his office.

Here are a few pages from those two calendars:


There is no end to what can be done with Storybook Creator software to create beautiful gifts for everyone on your list and not just for Christmas but for any holiday.

Happy Digi-Scrapping!  Sher

Thursday, December 27, 2012

Puzzle Cards - Merry and Nordic

Puzzle cards are a lot of fun.  They are easy.  They don't require a lot of exact measuring or even speccific supplies or papers AND they can be used in a whole range of ways.  The variations are endless.  Some of my customers called them stained glass cards and I like that too.

Wanna learn to make some puzzle cards?  Here's what they look like:

These puzzle cards are made with Be Merry paper.
 
I also made some with the Nordic papers.


Here are the steps to make your own puzzle cards.

Step 1.  Select the papers you'd like to use.  The number of papers you select will determine both the number of pieces in each puzzle AND the number of cards you can make in one "batch."

Step 2.  Cut the selected papers into the same shape (any shape! square, rectangle, circle, heart, etc...)

Step 3.  Stack the papers atop one another.  Turn the stack upside down.  Draw a puzzle design on the bottom of the bottom paper in the stack.  Cut through all the papers (if there are a lot of papers you may need to cut just 2 or 3 at a time) so that the same puzzle shapes are cut from each paper.

Step 4.  Flip the stack over so that the paper designs you want to see on the cards are facing up towards you.

 
Step 5.  Choose a solid color piece of cardstock as the background. Leave the first pile as is.  Move the top paper from the second pile to the bottom of the pile.  Move the top two papers from the third pile to the bottom of the third pile etc etc... until one of each paper design is on top of each stack.
 
Step 6.  Begin adding the top puzzle piece to the cardstock, recreating your original puzzle design.  Leave a bit of background showing through between each piece and around all the edges of your original shape.


Note:  I don't cut my background paper until all of the puzzle pieces are taped down.

Step 7.  Repeat steps 5 and 6 until all of the puzzle pieces from all of the stacks are gone.  There should never be a duplicate paper design in the same finished puzzle card.

Step 8.  Use this puzzle card as a gift tag, a scrapbook page element or mount it onto another folded piece of cardstock to make a greeting card.  You can also add a title or other embellishment to the front of the puzzle.  Changing to different background papers also changes the stained glass look of your puzzle card.

NOTE:  If you used a Custom Cutting System shape for your puzzle, make sure there is ONE SIZE BIGGER of that same shape to cut the outside of the background paper.  With a square or rectangular puzzle, that isn't necessary. 

Your puzzle can be small or large or any size you like with as many pieces as you want to include.  You can use ANY paper pack, coordinating or random scraps.

 
Aren't they great? And easy? It's a great way to showcase a specific paper pack and all of it's designer papers for your clients.  It's also a super way to use up the rest of a package after you are done with it in your traditional album.  Rather than have lots of paper package left overs, I try to find ways to use a package up, knowing that I will want to purchase a new set of paper designs to use the next year!
 
Happy Traditional Scrapping!  Sher

Wednesday, December 26, 2012

Be Merry, Traditional Style

Not a Nordic Christmas fan?  Well, don't despair... BE MERRY!  Make sure to pick up some GO MERRY products if you didn't get them already.  Here is some traditional inspiration using the Be Merry products:

Product Image
get Be Merry Paper here

Product Image

I made these borders using the Be Merry products:


The wreath border can be made by using the scallop punch to make five scallops with Be Merry paper.  Next, punch a circle using the circle maker.  Center to the circle atop the scallop and attach with tape runner.  Use a small heart punch to make two hearts out of the same paper.  Put the tip ends of the hearts together to make a bow.  Attach the wreaths to a border strip.
 
To make the Christmas bulb border and the gift box border, visit the instructions in the Go Nordic post here.
 
 
For directions on the Squared off scraps border, visit the Nordic post here. 
 
To create the mini envelop border, cut 6 small rectangles 2" X  2.5"  Fold the rectangle and cut cut the front folded part into a point.  Use a sticker embellishment to seal the envelope.  Attach the sealed envelopes to a border strip.
 
Make the ribbon border the same way it's described in the Go Nordic post.  Once the ribbons are attached and shortened to stair step lengths, use scissors to cut away part of the bottom of the ribbon in an upside down V shape.


Make the tree border the same way it's described in the Go Nordic post.  However, punch an embellishment (I used the starburst maker) to add a tree topper.


 Next up - Be Merry and Nordic puzzle cards (puzzle cards can be made using ANY paper) - consider a new paper pack starting in January!!!


Go NORDIC!

Did you or any of your customers purchase the Nodic Paper Collection from Creative Memories at a holiday sale or open house? 


Product Image
Get them here.


Product Image
Paper Pack HERE.


Product Image
Dual Layered Stickers HERE.
What did you make with it?  Have you take a lot of Christmas photos that you plan to add to your traditional scrapbook albums?  If so, here are few borders and other designs for you to make using the Nordic products.


Border #1 - at the top is called squared off scraps.  I took lots of little nordic scraps and cut them into squares and rectangles of varying sizes.  I attached them to the border strip overlapping one another and then added stickers and other embellishments.  It's a super easy and measurment free border.
 
 
Border #2 (3rd one down on the board) is christmas bulbs.  Cut a circle out of random papers with the 1.5" circle maker or the custom cutting system.  Attach the circles to a border strip.  To make the tops of the bulbs, cut a 1/2" strip of nordic paper.  Cut the strip into random width rectangles.  Then use scissors to slightly angle the sides of the little rectangles before taping them to the tops of the bulbs at varying angles.
 
Border #3 - Boxed Gifts.  Punch squares from both sizes on the square maker from nordic papers.  Attach to a border strip. Use both the fine tip and the round tip of the black dual tip journaling pen to make bow and ribbon decorations on each gift box.
 
Border #4 - Hanging Ribbons.  Use the personal trimmer to cut 2" wide strips of nordic paper.  Attach the top of each strip to a border.  Starting with the longest piece, cut a bit off the bottom of each piece from left to right making each border shorter as you travel to the right.  I did my cutting without measuring and using a pair of scissor.  Punch a border using the border maker (any pattern will do).  Attach the border maker strip atop the lengths of ribbon.  Add a title sticker or other embellishment to finish it off.
 
Border #5 - Nordic Trees.  To make the trees, I cut varying widths of paper strips from nordic paper.  Then, I draw a dot at the top center of the rectangular strip.  I line up the dot with one of the lower corners of the rectangular strip on the personal trimmer and cut a slanted line.  Then I line up the dot with the other lower edge of the strip, cutting a second slanted line.  VOILA - a triangular tree.  Small random rectangles from the same design paper add trunks to all the trees.  Add trees to the border strip lining up the bottom of their trunks in an even row.  Punch a few hearts using a shape maker and add to a few trees for a final embellishment.


Philly in Holiday Splendor

The Thursday before Christmas I spent the day in Philly with my hubby.

We visited all the FREE sights and the holiday lights - had a nice dinner and got totally into the holiday spirit, city-style.

I used the Storybook Creator 4.0 program to give a little overview of our time.  I love this software!  It's so much more fun to relate a story in book form rather than just a photo with a caption.

Enjoy - and happy holidays (next up, Be Merry and Nordic traditional scrapbook designs):


Related Posts Plugin for WordPress, Blogger...