


This is my first time using a 6X6 stack pack and the layered stickers are pretty new so I hadn't tried them out either. All in all, I really like them BOTH!
The stack pack is cool. It's a great product to show your customers because mine really didn't understand what to do with a bunch of tiny square papers until I showed them. I promise you that my customers will be really looking forward to additional stack packs after this!
The top of the stack pack has several pages of die cuts. Upside, there are TONS of die cuts and all of them are double-sided so they can be used with a variety of designs. Downside, unperforating the die cuts is NOT for the feint of heart... the paper is thin, the perforations are few and it all tears very easily. A bit heavier paper for the die cut pages with better perforations would be an improvement. That said, I got them all apart with no tears. I LOVED that the outside of the die cut paper is a frame. I used all my frames... more to that later.
Next, the stack pack has "sets" of 4 papers, all the same with coordinating (I love coordinating NOT matching) designs on the front and back - and here is where the magic of this paper pack occurs. Combining FOUR stack pack papers makes a 12X12 page design - fabulous (no worries, I have photo samples).
First, I did the most obvious thing and made a few 12X12 layouts. Here they are:


I used the papers 2 ways. One, diagonally with the front and reverse sides of the same paper "set." And second, half and half with the front and reverse sides of a paper "set." Of course, using 4 papers of the SAME side would make one unified single pattern 12X12 design. And you could also use 3 of one design and 1 of the opposite side of a "set" as well. You could combine sets, but that was too much mixing up of design for me.
Next, I wanted to show how to use the FRAMES from the DIECUT pages made awesome cards - cards that could be used as cards, have a photo added to them, then be cut back apart and used in an album.
To make each card, I used a 6X12" piece of card stock folded in half. To the front of the card I applied one stack pack paper and over that, one of the die cut frames. Then, I added some die cut embellishments. I left room for a halloween themed photo to be added. Here are the 3 cards I came up with (sorry for the bad photos I could NOT get these papers to photograph well):


Okay - next. I know I know, borders are thing of the past, but I still have a lot of clients who LOVE to scrapbook old school style, with lots of white page space and journaling directly on an album page. And like me, I have a lot of frugal customers who like to get the most out of their supplies, making borders is GREAT for that. I love borders because if I'm not ready to create an album page with a paper theme I like, I can create the borders, use the product while it's new and them save them for a later use. Adding a pre-made border to a page or to a power layout makes album making go really fast - so I still like borders.
My customers would want to know how to make a 6" square into a 12" border so I definately wanted to make some borders with this stack pack.
In making the borders, I also wanted to highlight the limited edition border maker cartridges:


I really love both of these - especially the rustic fence which can be used for SO many other seasons! These cartridges were a BIG hit at my event and using them to make the borders really helped people to see the possibilities. Are you ready? I love these borders...they are so so cute. I was really happy with how they turned out so I hope you like them too!


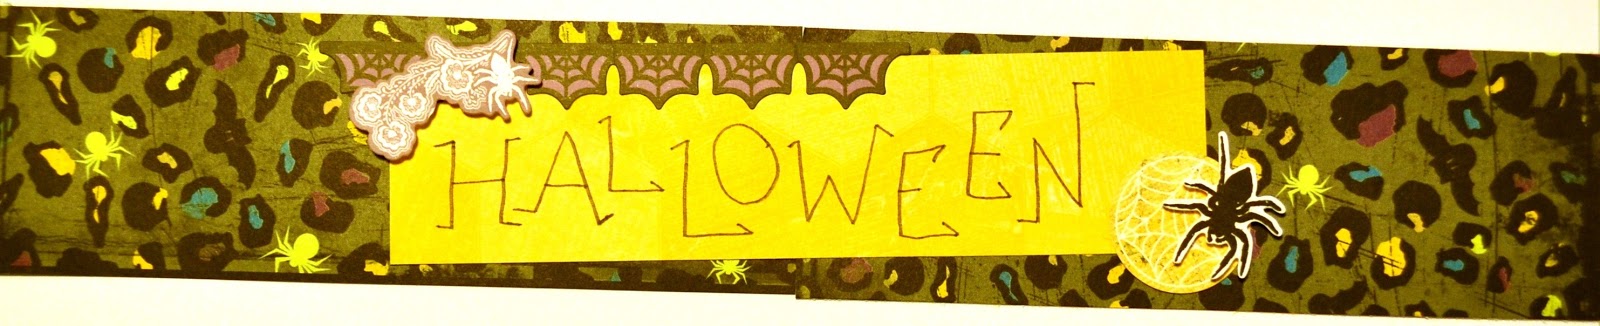

Yes, I did add one piece of orange cardstock to my designs. But most everything came from the stack pack. I mostly used stack pack papers cut to 2"X6" size and then combined 2 together to make one 2"X12" border. Most of the designs had an embellishment covering the line down the middle of the border, but really, it wasn't very noticible. The layered stickers were so easy to peel off and stick -they were JUST the right weight of paper and I loved the dimension that came from the foam square.
The word HALLOWEEN in the one border was just written with the fine tip side of a black pen by hand - it's not an embellishment.
Once I create my designs, I mount them onto foam boards with thumb tacks and paper clips and binder clips (I do so without damaging the designs themselves) and then I display them.
The Hocus Pocus designs were one HALF of lesson 2. The other half used the DREAM products to create inspiration boards - and that will be posted in another lesson.
Also, I like to assure all of my customers that they are able to add the hocus pocus designs to their digital pages with our digital products as well. AND... they can EASILY get instant satisfaction by downloading them RIGHT AWAY and using them on their pages RIGHT AWAY... who can resist INSTANT? Right?
Finally, all these lessons I was teaching had a GAME element to them... I'll get to that in another post. We played ONE game - with LOTS of drawings... making something from the lessons was part of the game. For this lesson (including the DREAM designs too) I asked my customers to create something from the products I used, with the tools I used, or containing the concepts I taught - or to copy a design technique with other products that worked with the theme of their photos. More about our game in a later post.
Stay tuned for more croptober lessons and ideas and happy Hocus Pocus scrapping! Sher
No comments:
Post a Comment